O-RAN NearRT-RIC and xApp
Overview
This application note shows how to use the E2 interface exposed by srsRAN Project gNodeB and showcases its interoperability with third-party RIC frameworks. For this purpose, we use O-RAN Alliance compliant NearRT-RICs and xApps provided in ORAN SC RIC and FlexRIC projects.
Our E2 interface implementation is based on the following O-RAN technical specifications:
O-RAN.WG3.E2AP-R003-v03.00
O-RAN.WG3.E2SM-R003-v03.00
O-RAN.WG3.E2SM-KPM-R003-v03.00
O-RAN.WG3.E2SM-RC-R003-v03.00
Setup Overview
The following diagram presents the setup architecture used in this application note:
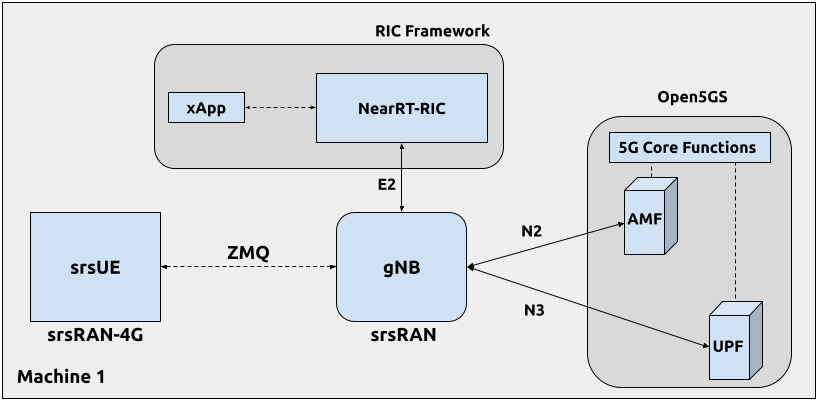
Hardware and Software Overview
For this application note, the following hardware and software are used:
PC with Ubuntu 22.04.1 LTS
srsRAN UE (srsRAN 4G 23.04 or later)
Wireshark (Version 4.0.7 or later)
Limitations
While our ultimate goal is to fully support the E2 interface, it is still under development and its current version is limited in features and operation. Specifically, the current E2 interface implementation supports only E2SM_KPM and E2SM_RC service models with the following limitations:
E2SM_RC service model:
Only Control Service Style 2 is supported
E2SM_KPM service model:
All Report Service Styles (1 - 5) are supported
Monitoring period limited to 1s
The following 3 ‘dummy’ DU metrics are exposed (they will be removed in future releases):
CQI
RSRP
RSRQ
The following 6 ORAN defined metrics are expose:
DRB.UEThpDl- DL throughput
DRB.UEThpUl- UL throughput
DRB.RlcPacketDropRateDl- UL packet success rate
DRB.PacketSuccessRateUlgNBUu- RLC DL packet drop rate
DRB.RlcSduTransmittedVolumeDL- RLC DL transmitted SDU volume
DRB.RlcSduTransmittedVolumeUL- RLC UL transmitted SDU volume
Installation
For the purpose of presenting the usage of E2 interface exposed by srsRAN Project gNodeB, we use the NearRT-RIC and an example KPM monitoring xApps from the ORAN SC RIC and FlexRIC frameworks.
Note
Depending on which RIC you are using, you should select the appropriate instructions from the tabs below. The tabs are grouped throughout the tutorial, so you only need to select the appropriate instructions in this section.
O-RAN Software Community (SC) Near-Real-time RIC is a reference platform that aligns with the architecture and specifications created in the O-RAN Alliance working groups.
The ORAN SC RIC platform is an advanced software framework with a functionality that includes platform health monitoring, alarms, etc. Since it relies on Kubernetes and Helm for deployment, reliability, and scalability, its vanilla installation is quite complex, involves many steps, and requires a high level of knowledge and expertise in those frameworks.
In this application note, we use a minimal version of the O-RAN SC near-RT RIC (i-release), that can be easily deployed as a multi-container application using a single Docker command, eliminating the necessity for Kubernetes or Helm.
Specifically, we will deploy ORAN SC RIC using Docker and configuration files provided in this repository.
The ORAN SC RIC deployment is performed as follows:
git clone https://github.com/srsran/oran-sc-ric
cd ./oran-sc-ric
docker compose up
The FlexRIC framework provides O-RAN Alliance compliant E2 node Agent emulators, a NearRT-RIC and xApps written in C/C++ and Python.
The O-RAN specifications are evolving and FlexRIC is under development with multiple tracks (i.e. git branches).
In this tutorial, we use br-flexric branch (commit: 1a3903a7).
FlexRIC requires the following dependencies to be installed (see FlexRIC Installation Guide for details):
sudo apt-get update
sudo apt-get install swig libsctp-dev python3 cmake-curses-gui python3-dev pkg-config libconfig-dev libconfig++-dev
The FlexRIC installation is performed as follows:
git clone https://gitlab.eurecom.fr/mosaic5g/flexric.git
cd flexric
git checkout br-flexric
mkdir build
cd build
cmake -DKPM_VERSION=KPM_V3_00 -DXAPP_DB=NONE_XAPP ../
make
sudo make install
Note that while by default Ubuntu 22.04.1 uses gcc-11, the used FlexRIC version can be built only with gcc-10. One possible way to switch gcc version is to use update-alternatives tool, for example:
sudo update-alternatives --config gcc

There are 3 choices for the alternative gcc (providing /usr/bin/gcc).

  Selection    Path             Priority   Status
------------------------------------------------------------
  0            /usr/bin/gcc-11   11        auto mode
* 1            /usr/bin/gcc-10   10        manual mode
  2            /usr/bin/gcc-11   11        manual mode
  3            /usr/bin/gcc-9    9         manual mode

Press <enter> to keep the current choice[*], or type selection number:
Open5GS
For this example we are using Open5GS as the 5G Core.
Open5GS is a C-language Open Source implementation for 5G Core and EPC. The following links will provide you with the information needed to download and set-up Open5GS so that it is ready to use with srsRAN:
For the purpose of this application note, we will use a dockerized Open5GS version provided in srsRAN Project at srsgnb/docker.
ZeroMQ
On Ubuntu, ZeroMQ development libraries can be installed with:
sudo apt-get install libzmq3-dev
Alternatively, ZeroMQ can also be built from source.
First, one needs to install libzmq:
git clone https://github.com/zeromq/libzmq.git
cd libzmq
./autogen.sh
./configure
make
sudo make install
sudo ldconfig
Second, install czmq:
git clone https://github.com/zeromq/czmq.git
cd czmq
./autogen.sh
./configure
make
sudo make install
sudo ldconfig
Finally, you need to compile srsRAN Project and srsRAN 4G (assuming you have already installed all the required dependencies).
Note
If you have already built and installed srsRAN 4G and srsRAN Project prior to installing ZMQ and other dependencies you will have to re-build both to ensure the ZMQ drivers have been recognized correctly.
srsRAN Project
For srsRAN Project, the following commands can be used to download and build from source:
git clone https://github.com/srsran/srsRAN_Project.git
cd srsRAN_Project
mkdir build
cd build
cmake ../ -DENABLE_EXPORT=ON -DENABLE_ZEROMQ=ON
make -j`nproc`
ZeroMQ is disabled by default, this is enabled when running cmake by including -DENABLE_EXPORT=ON -DENABLE_ZEROMQ=ON.
Pay extra attention to the cmake console output. Make sure you read the following line:
...
-- FINDING ZEROMQ.
-- Checking for module 'ZeroMQ'
--   No package 'ZeroMQ' found
-- Found libZEROMQ: /usr/local/include, /usr/local/lib/libzmq.so
...
srsUE
If you have not already done so, install the latest version of srsRAN 4G and all of its dependencies. This is outlined in the installation guide.
Please check our srsRAN 4G ZeroMQ Application Note for information on installing ZMQ and using it with srsRAN 4G/ srsUE.
Configuration
Here, we use ZMQ-based setup, and hence the configuration files are based on those introduced in srsRAN gNB with srsUE application note.
The following config files were modified to use ZMQ-based RF driver and enable E2 interface in srsRAN Project gNodeB:
Details of the modifications made are outlined in the following sections. The description of the remaining config parameters is available in srsRAN gNB with srsUE application note.
It is recommended you use these files to avoid errors while changing configs manually. Any configuration files not included here do not require modification from the default settings.
gNB
Here, we describe the gNB configuration parameters related to the E2 agent.
Enable E2 agents in all DUs and enable E2SM_KPM service module:
e2:
  enable_du_e2: true                # Enable DU E2 agent (one for each DU instance)
  e2sm_kpm_enabled: true            # Enable KPM service module
  e2sm_rc_enabled: true             # Enable RC service module
  addr: 127.0.0.1                   # RIC IP address
  port: 36421                       # RIC port
Enable E2AP packet captures and set the name of the output pcap file:
pcap:
  e2ap_enable: true                              # Set to true to enable E2AP PCAPs.
  e2ap_du_filename: /tmp/gnb_du_e2ap.pcap        # Path where the DU E2AP PCAP is stored.
  e2ap_cu_cp_filename: /tmp/gnb_cu_cp_e2ap.pcap  # Path where the CU-CP E2AP PCAP is stored.
  e2ap_cu_up_filename: /tmp/gnb_cu_up_e2ap.pcap  # Path where the CU-UP E2AP PCAP is stored.
Enable Enable RLC and DU scheduler metrics reporting that will feed E2SM_KPM service model with measurements data:
metrics:
  layers:
    enable_rlc: true                # Enable RLC metrics
    enable_sched: true              # Enable DU scheduler metrics
  periodicity:
    du_report_period: 1000          # Set DU statistics report period to 1s
Running the Network
The following order should be used when running the network:
Open5GS
NearRT-RIC
gNB
UE
Start IP traffic (e.g., ping)
xApp
Open5GS Core
srsRAN Project provides a dockerized version of the Open5GS. It is a convenient and quick way to start the core network. You can run it as follows:
cd ./srsRAN_Project/docker
docker compose up 5gc
Note that we have already configured Open5GS to operate correctly with srsRAN Project. Moreover, the UE database is populated with the credentials used by our srsUE.
NearRT-RIC
To start the ORAN SC RIC platform as a multi-container application, run the following command from the oran-sc-ric directory:
cd ./oran-sc-ric
docker compose up
Docker should download and build (when running for the first time) seven containers. When all containers are successfully deployed, the following message should be displayed on the NearRT-RIC console output:
ric_submgr | RMR is ready now ...
Start example NearRT-RIC provided in FlexRIC framework:
./flexric/build/examples/ric/nearRT-RIC
The NearRT-RIC console output should be similar to:
Setting the config -c file to /usr/local/etc/flexric/ric.conf
[LibConf]: loading service models from SM_DIR: /usr/local/lib/flexric/
[LibConf]: reading configuration for NearRT_RIC
[LibConf]: NearRT_RIC IP: 127.0.0.1
[LibConf]: E2_Port Port: 36421
[LibConf]: E42_Port Port: 36422
[NEAR-RIC]: nearRT-RIC IP Address = 127.0.0.1, PORT = 36421
[NEAR-RIC]: Initializing
[NEAR-RIC]: Loading SM ID = 3 with def = ORAN-E2SM-RC
[NEAR-RIC]: Loading SM ID = 142 with def = MAC_STATS_V0
[NEAR-RIC]: Loading SM ID = 148 with def = GTP_STATS_V0
[NEAR-RIC]: Loading SM ID = 146 with def = TC_STATS_V0
[NEAR-RIC]: Loading SM ID = 145 with def = SLICE_STATS_V0
[NEAR-RIC]: Loading SM ID = 143 with def = RLC_STATS_V0
[NEAR-RIC]: Loading SM ID = 2 with def = ORAN-E2SM-KPM
[NEAR-RIC]: Loading SM ID = 144 with def = PDCP_STATS_V0
[iApp]: Initializing ...
[iApp]: nearRT-RIC IP Address = 127.0.0.1, PORT = 36422
fd created with 6
[NEAR-RIC]: Initializing Task Manager with 2 threads
gNB
We run gNB directly from the build folder, i.e., ./srsRAN_Project/build/apps/gnb/, (the config file is also located there) with the following command:
# when running with ORAN SC RIC
sudo ./gnb -c gnb_zmq.yaml e2 --addr="10.0.2.10" --bind_addr="10.0.2.1"

# when running with FlexRIC
sudo ./gnb -c gnb_zmq.yaml e2 --addr="127.0.0.1" --bind_addr="127.0.0.1"
The gNB console output should be similar to:
--== srsRAN gNB (commit 0b2702cca) ==--

Connecting to AMF on 10.53.1.2:38412
Available radio types: zmq.
Connecting to NearRT-RIC on 127.0.0.1:36421
Cell pci=1, bw=10 MHz, dl_arfcn=368500 (n3), dl_freq=1842.5 MHz, dl_ssb_arfcn=368410, ul_freq=1747.5 MHz

==== gNodeB started ===
Type <t> to view trace
The Connecting to AMF on 10.53.1.2:38412 message indicates that gNB initiated a connection to the core. While, the Connecting to NearRT-RIC on 127.0.0.1:36421 message indicates that gNB initiated a connection to the NearRT-RIC.
If the connection attempt is successful, the following (or similar) will be displayed on the NearRT-RIC console:
ric_rtmgr_sim | 2024/04/02 11:07:39 POST /ric/v1/handles/associate-ran-to-e2t body: [{"E2TAddress":"10.0.2.10:38000","ranNamelist":["gnb_001_001_00019b"]}] elapsed: 10.77µs
Received message with id = 411, port = 1715
[E2AP] Received SETUP-REQUEST from PLMN   1. 1 Node ID 411 RAN type ngran_gNB_DU
[NEAR-RIC]: Accepting RAN function ID 2 with def = ORAN-E2SM-KPM
[iApp]: no xApp connected, no need to generate E42 UPDATE-E2-NODE
srsUE
First, the correct network namespace must be created for the UE:
sudo ip netns add ue1
Next, we start srsUE. This is also done directly from within the build folder (i.e., /srsRAN_4G/build/srsue/), with the config file in the same location:
sudo ./srsue ue_zmq.conf
If srsUE connects successfully to the network, the following (or similar) should be displayed on the console:
Built in Release mode using commit fa56836b1 on branch master.

Opening 1 channels in RF device=zmq with args=tx_port=tcp://127.0.0.1:2001,rx_port=tcp://127.0.0.1:2000,base_srate=11.52e6
Supported RF device list: UHD zmq file
CHx base_srate=11.52e6
Current sample rate is 1.92 MHz with a base rate of 11.52 MHz (x6 decimation)
CH0 rx_port=tcp://127.0.0.1:2000
CH0 tx_port=tcp://127.0.0.1:2001
Current sample rate is 11.52 MHz with a base rate of 11.52 MHz (x1 decimation)
Current sample rate is 11.52 MHz with a base rate of 11.52 MHz (x1 decimation)
Waiting PHY to initialize ... done!
Attaching UE...
Random Access Transmission: prach_occasion=0, preamble_index=0, ra-rnti=0x39, tti=334
Random Access Complete.     c-rnti=0x4601, ta=0
RRC Connected
PDU Session Establishment successful. IP: 10.45.1.2
RRC NR reconfiguration successful.
It is clear that the connection has been made successfully once the UE has been assigned an IP, this is seen in PDU Session Establishment successful. IP: 10.45.1.2.
The NR connection is then confirmed with the RRC NR reconfiguration successful. message.
IP Traffic with ping
Ping is the simplest tool to test the end-to-end connectivity in the network, i.e., it tests whether the UE and core can communicate. Here, we use it to generate traffic from UE, hence the gNB can measure data transmission-related metrics (e.g., throughput).
To run ping from UE to the core, use:
sudo ip netns exec ue1 ping -i 0.1 10.45.1.1
Note that we set the ping interval to 0.1s to increase the traffic volume.
Example ping output:
PING 10.45.1.1 (10.45.1.1) 56(84) bytes of data.
64 bytes from 10.45.1.1: icmp_seq=1 ttl=64 time=32.2 ms
64 bytes from 10.45.1.1: icmp_seq=2 ttl=64 time=35.3 ms
64 bytes from 10.45.1.1: icmp_seq=3 ttl=64 time=38.2 ms
64 bytes from 10.45.1.1: icmp_seq=4 ttl=64 time=71.5 ms
64 bytes from 10.45.1.1: icmp_seq=5 ttl=64 time=32.9 ms
You can also ping the from core to the UE. First add a route to the UE on the host machine (i.e. the one running the Open5GS docker container):
sudo ip ro add 10.45.0.0/16 via 10.53.1.2
Check the host routing table:
route -n
It should contain the following entries (note that Iface names might be different):
Kernel IP routing table
Destination     Gateway         Genmask         Flags Metric Ref    Use Iface
0.0.0.0         192.168.0.1     0.0.0.0         UG    100    0        0 eno1
10.45.0.0       10.53.1.2       255.255.0.0     UG    0      0        0 br-dfa5521eb807
10.53.1.0       0.0.0.0         255.255.255.0   U     0      0        0 br-dfa5521eb807
...
Next, add a default route for the UE as follows:
sudo ip netns exec ue1 ip route add default via 10.45.1.1 dev tun_srsue
Check the routing table of ue1:
sudo ip netns exec ue1 route -n
The output should be as follows:
Kernel IP routing table
Destination     Gateway         Genmask         Flags Metric Ref    Use Iface
0.0.0.0         10.45.1.1       0.0.0.0         UG    0      0        0 tun_srsue
10.45.1.0       0.0.0.0         255.255.255.0   U     0      0        0 tun_srsue
Now ping the UE:
ping -i 0.1 10.45.1.2
In addition, iperf tool can be used to generate traffic at higher data rates than ping. For example, to send UL traffic from UE, one needs to run the following command:
sudo ip netns exec ue1 iperf -c 10.45.1.1 -u -b 10M -i 1 -t 60
xApps
To start the provided example kpm_mon_xapp.py, run the following command from the oran-sc-ric directory:
docker compose exec python_xapp_runner ./kpm_mon_xapp.py --metrics=DRB.UEThpDl,DRB.UEThpUl --kpm_report_style=5
The xApp allows subscribing with all E2SM-KPM Report Styles (i.e., 1-5) and to set the metric names. With the above parameters, the xApp should subscribe to DRB.UEThpUl and DRB.UEThpUl measurements, and display the content of received RIC_INDICATION messages. The xApp console output should be similar to:
RIC Indication Received from gnb_001_001_00019b for Subscription ID: 5, KPM Report Style: 5
E2SM_KPM RIC Indication Content:
-ColletStartTime:  2024-04-02 13:24:56
-Measurements Data:
--UE_id: 0
---granulPeriod: 1000
---Metric: DRB.UEThpDl, Value: [7]
---Metric: DRB.UEThpUl, Value: [7]
On start, the xApp sends a subscription request to the NearRT-RIC, therefore the following (or similar) should be displayed on the NearRT-RIC console:
ric_rtmgr_sim | 2024/04/02 13:35:33 POST /ric/v1/handles/xapp-subscription-handle body: {"address":"10.0.2.20","port":4560,"subscription_id":1} elapsed: 13.263µs
On exit, the xApp sends a subscription delete request to the NearRT-RIC and the following (or similar) should be displayed on the NearRT-RIC console:
ric_rtmgr_sim | 2024/04/02 13:35:40 DELETE /ric/v1/handles/xapp-subscription-handle body: {"address":"10.0.2.20","port":4560,"subscription_id":1} elapsed: 27.513µs
We use an example xapp_oran_moni xApp from the FlexRIC framework. The application connects to NearRT-RIC and uses E2SM_KPM service module to subscribe for measurement data using Report Service Style 1. The metric names are listed in the config file that has to be passed to the xApp:
Specifically, with the provided config file, the xApp subscribes for two metrics, namely DRB.UEThpDl and DRB.UEThpUl.
Start the xApp with the following command:
./flexric/build/examples/xApp/c/monitor/xapp_oran_moni -c ./xapp_mon_e2sm_kpm.conf
If xApp connects successfully to the NearRT-RIC, the following (or similar) should be displayed on the xApp console:
Setting the config -c file to ./config/xapp_mon_e2sm_kpm.conf
[LibConf]: loading service models from SM_DIR: /usr/local/lib/flexric/
[LibConf]: reading configuration for xApp
[LibConf]: NearRT_RIC IP: 127.0.0.1
[LibConf]: E42_Port Port: 36422
[LibConf]: Sub_ORAN_SM Name: KPM, Time: 1000
[LibConf]: format 1, RAN type ngran_gNB_DU, actions = DRB.UEThpDl DRB.UEThpUl
[LibConf]: xApp_DB enable: 0
[LibConf]: xApp_DB user: (null), pass: (null)
[xAap]: Initializing ...
[xApp]: nearRT-RIC IP Address = 127.0.0.1, PORT = 36422
[E2-AGENT]: Opening plugin from path = /usr/local/lib/flexric/librc_sm.so
[E2-AGENT]: Opening plugin from path = /usr/local/lib/flexric/libmac_sm.so
[E2-AGENT]: Opening plugin from path = /usr/local/lib/flexric/libgtp_sm.so
[E2-AGENT]: Opening plugin from path = /usr/local/lib/flexric/libtc_sm.so
[E2-AGENT]: Opening plugin from path = /usr/local/lib/flexric/libslice_sm.so
[E2-AGENT]: Opening plugin from path = /usr/local/lib/flexric/librlc_sm.so
[E2-AGENT]: Opening plugin from path = /usr/local/lib/flexric/libkpm_sm.so
[E2-AGENT]: Opening plugin from path = /usr/local/lib/flexric/libpdcp_sm.so
[NEAR-RIC]: Loading SM ID = 3 with def = ORAN-E2SM-RC
[NEAR-RIC]: Loading SM ID = 142 with def = MAC_STATS_V0
[NEAR-RIC]: Loading SM ID = 148 with def = GTP_STATS_V0
[NEAR-RIC]: Loading SM ID = 146 with def = TC_STATS_V0
[NEAR-RIC]: Loading SM ID = 145 with def = SLICE_STATS_V0
[NEAR-RIC]: Loading SM ID = 143 with def = RLC_STATS_V0
[NEAR-RIC]: Loading SM ID = 2 with def = ORAN-E2SM-KPM
[NEAR-RIC]: Loading SM ID = 144 with def = PDCP_STATS_V0
[xApp]: DB_ENABLE = FALSE
[xApp]: do not initial database
[xApp]: E42 SETUP-REQUEST sent
adding event fd = 5 ev-> 5
[xApp]: E42 SETUP-RESPONSE received
[xApp]: xApp ID = 7
Registered E2 Nodes = 1
Pending event size before remove = 1
Registered node 0 ran func id = 2
 [xApp]: reporting period = 1000 [ms]
The following (or similar) will be displayed on the NearRT-RIC console:
[iApp]: E42 SETUP-REQUEST received
[iApp]: E42 SETUP-RESPONSE sent
Next, the xApp sends the RIC Subscription Request message and upon successful subscription, it will periodically receive RIC Indication messages with the recent measurements of the requested metrics. The following (or similar) should be displayed on the xApp console:
Generated of req_id = 1
E42_RIC_SUBSCRIPTION_REQUEST 31
adding event fd = 5 ev-> 6
[xApp]: RIC SUBSCRIPTION REQUEST sent
[xApp]: SUBSCRIPTION RESPONSE received
Pending event size before remove = 1
[xApp]: Successfully SUBSCRIBED to ran function = 2
      1, KPM v2 ind_msg latency > 943897800 s (minimum time unit is in second) from E2-node type 2 ID 411
meas record INTEGER_MEAS_VALUE value 28
meas record INTEGER_MEAS_VALUE value 8312
      2, KPM v2 ind_msg latency > 927120585 s (minimum time unit is in second) from E2-node type 2 ID 411
meas record INTEGER_MEAS_VALUE value 4
meas record INTEGER_MEAS_VALUE value 11544
      3, KPM v2 ind_msg latency > 910343370 s (minimum time unit is in second) from E2-node type 2 ID 411
meas record INTEGER_MEAS_VALUE value 4
meas record INTEGER_MEAS_VALUE value 11411
      4, KPM v2 ind_msg latency > 893566155 s (minimum time unit is in second) from E2-node type 2 ID 411
meas record INTEGER_MEAS_VALUE value 4
meas record INTEGER_MEAS_VALUE value 11746
...
Note that the metrics’ names are not shown in this xApp, but their order should be the same as the order of metric listed in the xapp_mon_e2sm_kpm.conf config file (i.e., “DRB.UEThpDl” and “DRB.UEThpUl”).
The xApp can be stopped with CTRL+C signal. In such case, the following (or similar) should be displayed on the xApp console:
^Csignal 2 received !
CTRL+C detect
Remove handle number = 1
E42 RIC_SUBSCRIPTION_DELETE_REQUEST  sdr->ric_id.ran_func_id 2  sdr->ric_id.ric_req_id 1
[xApp]: E42 SUBSCRIPTION-DELETE sent
adding event fd = 5 ev-> 8
      9, KPM v2 ind_msg latency > 809680080 s (minimum time unit is in second) from E2-node type 2 ID 411
meas record INTEGER_MEAS_VALUE value 0
meas record INTEGER_MEAS_VALUE value 0
[xApp]: E42 SUBSCRIPTION DELETE RESPONSE received
Pending event size before remove = 1
[xApp]: Successfully received SUBSCRIPTION-DELETE-RESPONSE
Closing the agent socket: Socket operation on non-socket
[xApp]: Sucessfully stopped
Test xApp run SUCCESSFULLY
The following (or similar) will be displayed on the NearRT-RIC console:
[iApp]: SUBSCRIPTION-REQUEST xapp_ric_id->ric_id.ran_func_id 2
[E2AP] SUBSCRIPTION REQUEST generated
[NEAR-RIC]: nb_id 411 port = 1715
[NEAR-RIC]: nb_id 411 port = 1715
[NEAR-RIC]: SUBSCRIPTION DELETE REQUEST tx

[iApp]: RIC_SUBSCRIPTION_DELETE_REQUEST sent
[iApp]: RIC_SUBSCRIPTION_DELETE_RESPONSE sent
E2AP packet analyzer
Enable E2AP PCAP
You can enable E2AP PCAPs by following this guide.
Live capture
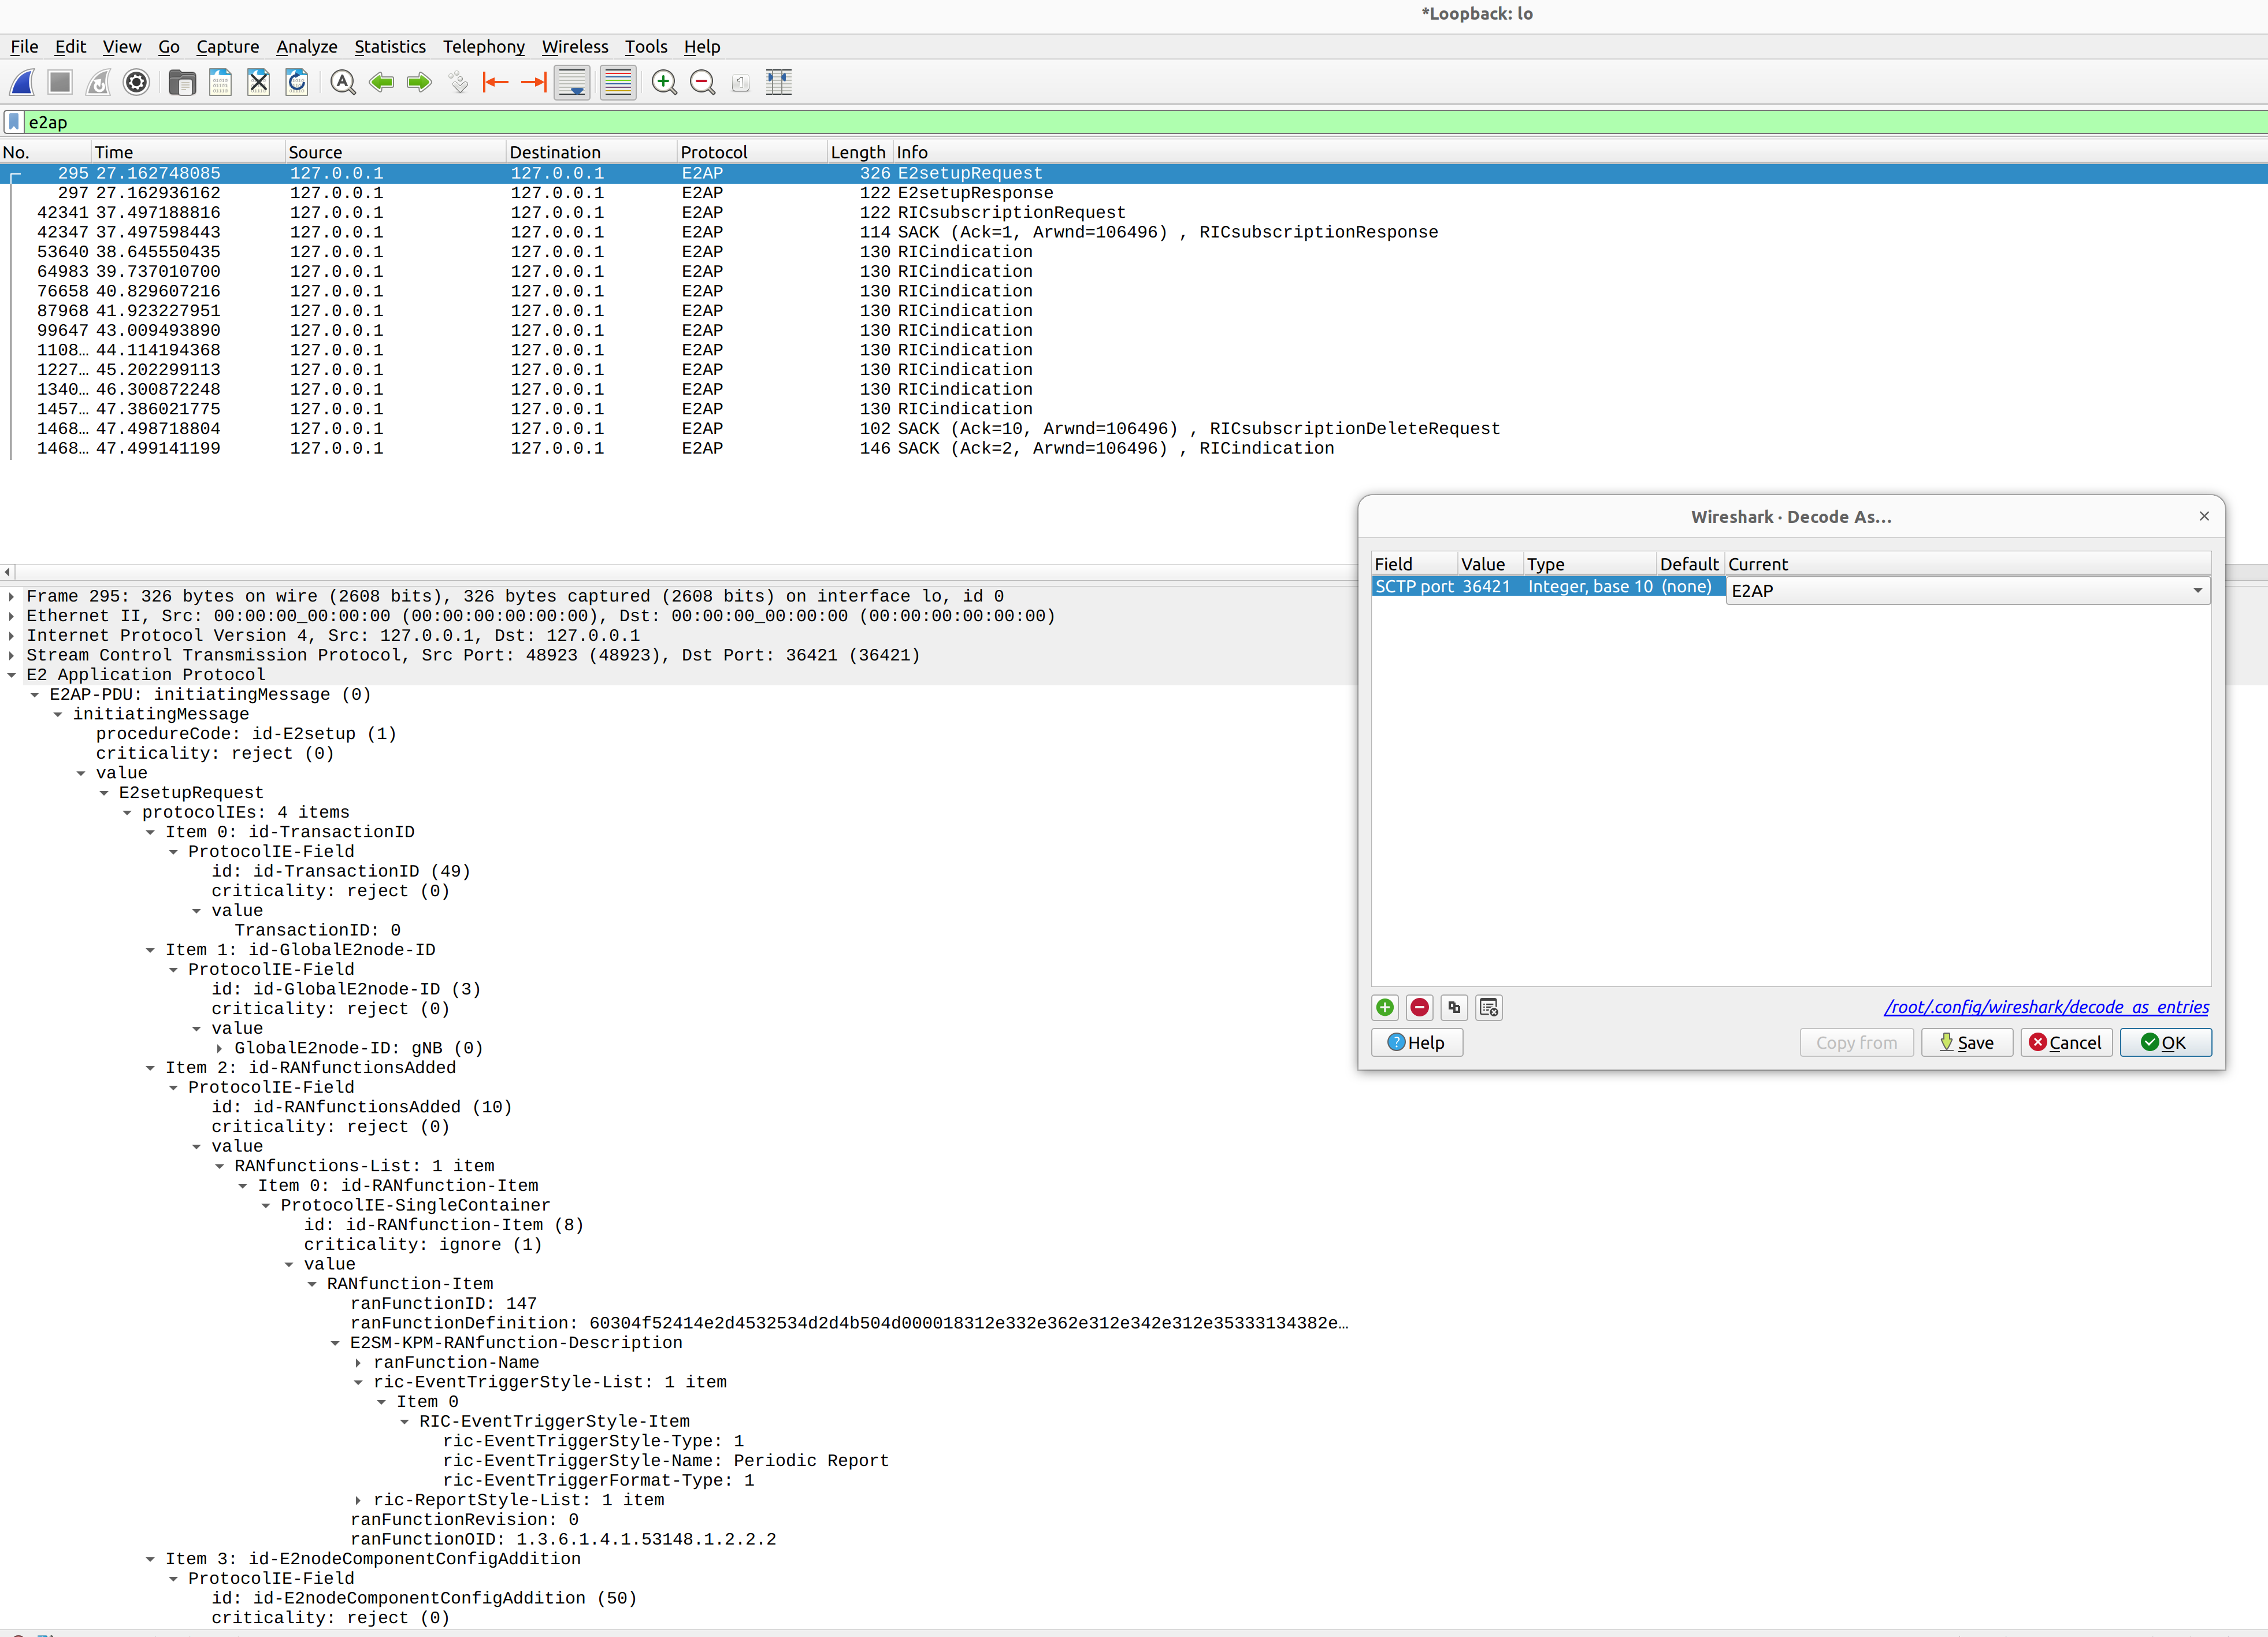
Wireshark can be used to collect E2AP packets exchanged between E2 agent (located in srsRAN gNB) and NearRT-RIC at runtime. This requires the following steps to be executed:
Start sniffing on the loopback interface.
Set filter to sctp.port == 36421.
Right-click on any packet -> Decode As.. -> set Current to E2AP
Now filter can be set to e2ap to show only E2AP messages.
Note that at least Wireshark version 4.0.7 is needed to correctly decode and display E2AP packets (i.e., earlier Wireshark versions do not support E2APv3 protocol and as a result will display information about the Malformed Packets).
The figure below shows an example trace of E2AP packets.
Troubleshooting
PCAP
E2AP dissector is still under development in Wireshark. Therefore, some fields are not decoded correctly in Wireshark version 4.0.7. Currently, the best option is to compile Wireshark from the source code. The screenshots presented in this tutorial were obtained with Wireshark version 4.1.0 (v4.1.0rc0-3390-g4f4a54e6d3f9).
Core Network not running
If the dockerized version of Open5Gs fails to run it may be due to the ports set in docker-compose.yml are already in use on your PC. For example, you may see an error like the following:
ERROR: for bdfcb7644f79_open5gs_5gc  Cannot start service 5gc: driver failed programming external connectivity on endpoint open5gs_5gc (2919e37332feb0a3001c44985b7e3d310ae82b7adb0e2cb1d9c214ed29ff39fa): Error starting userland proxy: listen tcp4 0.0.0.0:3000: bind: address already in use

ERROR: for 5gc  Cannot start service 5gc: driver failed programming external connectivity on endpoint open5gs_5gc (2919e37332feb0a3001c44985b7e3d310ae82b7adb0e2cb1d9c214ed29ff39fa): Error starting userland proxy: listen tcp4 0.0.0.0:3000: bind: address already in use
ERROR: Encountered errors while bringing up the project
In this case, the docker-compose file can be modified so that a different host port is used as 3000 is already in use. To do this, line 40 of the docker-compose.yml file can be update to use 3001 as the host port:
  services:
    5gc:
      container_name: open5gs_5gc
      build:
        context: open5gs
        target: open5gs
        args:
          OS_VERSION: "22.04"
          OPEN5GS_VERSION: "v2.6.1"
      environment:
        MONGODB_IP: ${MONGODB_IP:-127.0.0.1}
        SUBSCRIBER_DB: ${SUBSCRIBER_DB:-001010123456780,00112233445566778899aabbccddeeff,opc,63bfa50ee6523365ff14c1f45f88737d,8000,9,10.45.1.2}
        OPEN5GS_IP: ${OPEN5GS_IP:-10.53.1.2}
        UE_IP_BASE: ${UE_IP_BASE:-10.45.0}
        DEBUG: ${DEBUG:-false}
      privileged: true
      ports:
-       - "3000:3000/tcp"
+       - "3001:3000/tcp"
      # Uncomment port to use the 5gc from outside the docker network
        #- "38412:38412/sctp"
      command: 5gc -c open5gs-5gc.yml
      healthcheck:
        test: [ "CMD-SHELL", "nc -z 127.0.0.20 7777" ]
        interval: 3s
        timeout: 1s
        retries: 60
      networks:
        ran:
          ipv4_address: ${OPEN5GS_IP:-10.53.1.2}
UE issues
If the UE cannot connect to the network, ensure that the correct cell_cfg parameters are set in the gNB.
If the UE is connecting, but there is no PDU session being established you should check the following:
The APN configuration is the same across both the UE and Core
You are using the latest version of srsUE
IP Forwarding for the core has been enabled, you can do this by following this guide.
IP Forwarding for the UE has been enabled, see the following section
UE IP Forwarding
To ensure that the UE traffic is sent correctly to the internet the correct IP forwarding must be enabled. IP Forwarding should be enabled on the host machine, i.e. the one running the Open5GS docker container. This can be done with the following command:
sudo sysctl -w net.ipv4.ip_forward=1
sudo iptables -t nat -A POSTROUTING -o <IFNAME> -j MASQUERADE
Where <IFNAME> is the name of the interface connected to the internet.
To check that this has been configured correctly run the following command:
sudo ip netns exec ue1 ping -i 1 8.8.8.8
If the UE can ping the Google DNS, then the internet can be successfully accessed.
2nd Open5GS instance (installed manually)
The routing entries on the host PC for IPs: 10.45.0.0 and 10.53.1.0 should use the same interface, e.g.:
route -n

Kernel IP routing table
Destination     Gateway         Genmask         Flags Metric Ref    Use Iface
0.0.0.0         192.168.0.1     0.0.0.0         UG    100    0        0 eno1
10.45.0.0       10.53.1.2       255.255.0.0     UG    0      0        0 br-dfa5521eb807
10.53.1.0       0.0.0.0         255.255.255.0   U     0      0        0 br-dfa5521eb807
...
However, if a second instance of Open5GS (that was installed manually) is running on the host PC, the route to 10.45.0.0 goes to ogstun interface. For this reason, a UE cannot access the Internet, as the host will send packets to the manually installed Open5GS version. To solve this routing issue, you can disable (or even remove) the manually installed Open5GS – please check sections 6 and/or 7 of the Open5GS tutorial. In addition, you might need to disable the ogstun interface with the following command:
sudo ifconfig ogstun 0.0.0.0 down
RIC running on a different machine
If you are running your RIC on a different machine, you will need to correctly configure the E2 bind_addr parameter in the gNB config file. This is shown in the example config, with the line commented out. If you are running the RIC on a separate machine simply uncomment this option.